
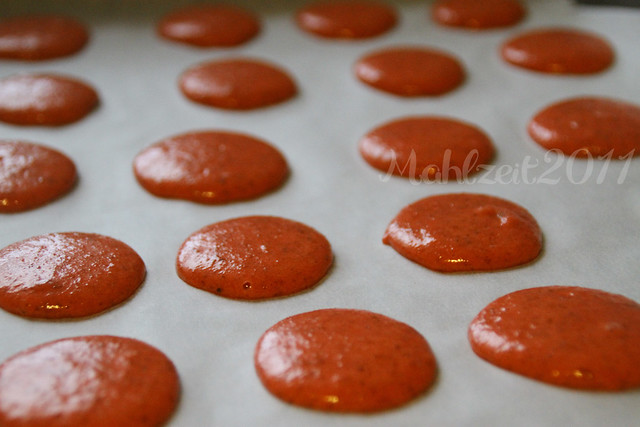
Like I haven’t told a thousand times how we love macarons. Here is another attempt of a different recipe and though the shells weren’t as shiny as the last time, they definitely developed lovely feet and they grew! For the recipe I followed Honey and Soy‘s religiously except for the meringue. It tends to be a bit runny if I put all of the meringue so I put in a bit at a time getting a feel of the texture of the batter to the right consistency.
For the macaron shells the standard ingredients would be:
First group ingredients:
600g sifted TPT (tant pour tant = 300g Almond meal with 300g icing sugar)
120g egg whites (aged overnight)
Second group ingredients:
300g Caster sugar
75g water
120g egg whites
You’ll need:
mixer
spatula
baking tray and paper (it’s nice if you can get a macaron template or you can draw circles on the paper)
oven
pans piping bag, nozzle
kitchen thermometer
1. In a mixer, combine TPT and egg whites, mix with a spatula to achieve a smooth paste. There are tips given by experienced macaron makers (chefs) that about 50 times only should the batter be mixed. More than that and it will make the batter runny. So I didn’t mix it that well as I still have to put the meringue later on.
2. Heat oven at 160°C/325°F. Place the egg whites (from the second ingredient group) in your mixing bowl.
In a sauce pan, mix sugar, water and food coloring and bring to a boil. Honey and Soy specifically said that when the mixture gets up to 115° you should start mixing the egg whites to soft consistency. Continue mixing, when the sugar and water reaches 118° pour it on to the egg whites and continue mixing for 3 minutes. Let the meringue cool, Honey and Soy suggested 50°.
3. When the meringue is cool enough, combine it with the tpt-egg white mixture. Mix with spatula from the sides going to the middle. (This could be heavy for my arm lol). Mix until you reach a shiny mixture.
4. Put the batter in a piping bag with a small tip nozzle. Pipe the mixture onto the baking paper, not exactly the size of the circle. Leave the macarons aside so that they dry up a bit and that they form skins, about 20 mins or so.
5. Depending on your oven, bake the macarons. I said depending because I’ve tried a lot of times and though some said to leave the door ajar, mine turned out hollow when I do that. So what I did was to keep the door closed but I lowered the oven to 150°C. I baked them for around 12 minutes, taking them out once to turn the tray. You can also check by touching a piece and you’ll know that it’s ready when it’s dry.
6. When they’re ready get them out of the oven and leave to cool a bit. Slide them off the baking paper and turn upside down (at least half of them). They’re ready to be filled in.

For the filling, I made chocolate ganache. For this you’ll need:
200g Fresh Cream 200g chocolate, chopped 75g butter, cubed
Put chopped chocolate in a heatproof bowl. Bring cream to a boil and pour on chopped chocolate. Put butter and combine well. There’s of course a much delicate way of doing this but will do. 🙂 It’s better to do the filling first so it will set before you put them between your macaron shells.
When you put the filling on top of one, make sure that it doesn’t get to the edge…sandwich the ganache being careful not to let them out…Let the macarons stand a few minutes then put them in the fridge and let to room temperature before serving.
Additional notes.
-Have someone help you if you’re not using a stand mixer.
-I should have remembered that I lend my nozzles and fixer to a friend. I improvised this time.

Her favorite treats.
—
Related story and more photos here.
—
A post for Weekend Eating, Tuesdays at the Table, Delectable Tuesday, Tasty Tuesday.
")


Believe it or not… one of items on my Bucket List is to eat the French macarons! this post made me drool! Thanks for linking up, G. Have a great week ahead.
I love macarons!
I played too. Mine are here and here.
Great article. Saved on Delicious 🙂
Aw, this was a really quality post. In theory I’d like to write like this too – taking time and real effort to make a good article… but what can I say… I procrastinate alot and never seem to get something done.
yummm……..parang ang hirap gawin! isa nalang ako sa kakain. lol.
ps. didn’t use kumareng FBC dun sa weekend eating post ko, G. gamit ko picasa lang kasi tamad magbukas ng ps. lol. thanks sa compliment!
…ung price pala ng FBC andun sa site nya…merong diff bundles para medyo maka.save ka ng konti… 😉
I haven’t had macarons before. I should scout for one around these parts. I’m sure there’s at least one bakery that sells this in SF.
I heard that the egg whites could age for up to 4 days outside! Most successful recipes say 24 to 48h, in a towel-covered bowl, at room temperature, to really help get rid of extra humidity.
I would work the macaronnage slightly differently: do the folding for 40 times, then use a pastry scrapper to press down the batter a dozen times to release extra air trapped in it.
This step will get you a smooth, shiny shell, quite flat a la Laduree but definitely not bumpy and swollen.
Hint: when you pipe out the batter, the “magma” flattens in a circle rather quickly.
Watch this 11 min video about the key macaronnage step: http://video.stv.tv/bc/entertainment-thehour-20110214-cooking/
These look simply yummy… and are adorable too! Thanks for linking up last week for Tasty Tuesday!
These are beautiful. I have yet to try Macarons myself and cannot wait to do so.
thx for sharing !!